Arcade1Up Custom Control Panel Mod Overview
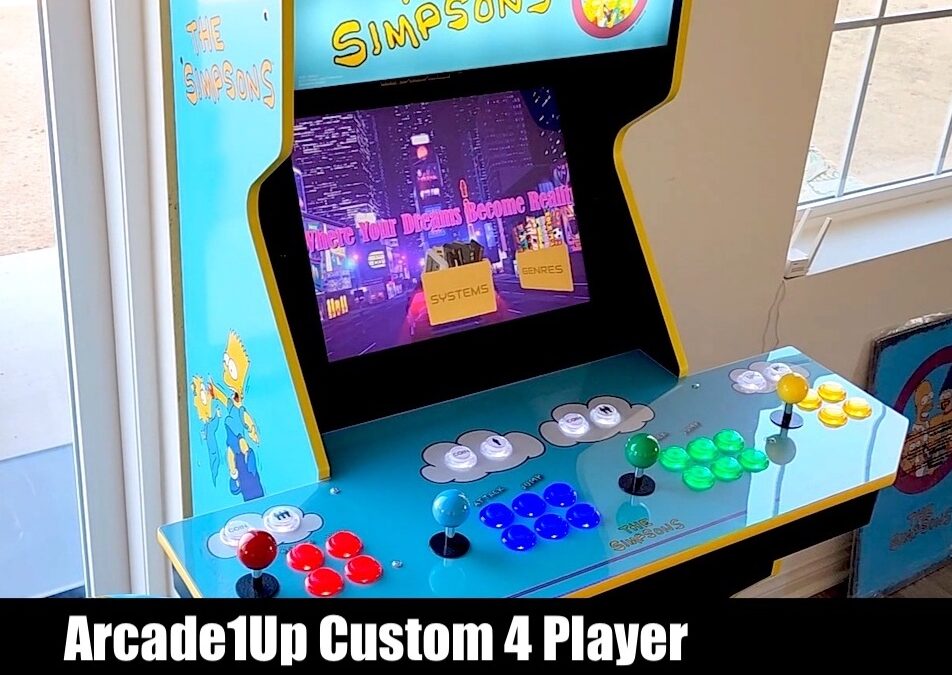
Already Soft Modded your Arcade1Up machine and looking to get all 4 player joysticks/buttons working for 1,000s of multiplayer arcade and console games? Tired of just having 2 buttons per joystick and ready to add more buttons? In this guide we are going to replace the existing Arcade1Up control panel with a custom 4 player control panel from 99 Lives Arcade and add 6-8 buttons per joystick in order to properly support multiplayer for pretty much ANY arcade game.
Check out this demo of the finished setup and quick video overview.
Disclaimer and Warnings
This site is for educational purposes only. Proceed at your own risk. There’s a chance this approach will void your Arcade1Up machine warranty and may prevent you from getting any future Arcade1Up software updates. There is also the possibility you could damage your machine beyond repair. Future Arcade1Up software updates could also lock down the system preventing your machine or this method from working.
Current Limitations
This approach worked on a 2022 Arcade1Up Simpsons arcade machine running Android 10 with a PCB that includes a USB and micro SD slot. Other specifications for this PCB include: model P71, ARMv7 CPU with 4 cores, 1GB Ram, 4GB internal storage, and Wi-Fi. This approach should also work for additional Arcade1Up machines that have been Soft Modded or Hard Modded.
In this guide we chose the new Flat 4 Player Control Panel from 99 Lives Arcade (released in early September 2022 for $99) in order to add additional buttons to each joystick set. Alternatively you could just drill additional button holes into your existing control panel or select a different custom control panel, but the price and professional quality of the 99 Lives Arcade panel will be hard to beat which is why we happily paid the full price.
The 4 Player Arcade Joystick/Buttons Kit with USB Encoders installed and tested in this guide are manufactured by EG Starts which fit perfectly in the 99 Lives Arcade control panel. Other brands may also work or you could potentially re-use the factory buttons, but we have have only tested this particular joystick/button set.
At the time of this writing, the factory Arcade1Up games do not support 3rd party joysticks/buttons and thus cannot be used to play the factory Arcade1Up games. Therefore in this guide we will change the default start app to Dig (or RetroArch) that will launch whenever you turn on the arcade machine and give you access to your library of 1,000s of games. There is however a workaround we are investigating to make this backwards compatible.
Prerequisites
- Arcade1Up Machine that has been Soft Modded (see Hacking the Arcade1Up Simpsons Machine) or Hard Modded (PCB replaced with raspberry pi, NUC, etc)
- RetroArch installed (see Hacking the Arcade1Up Simpsons Machine)
Tools Needed
- 4 Player Arcade Joystick/Buttons Kit with USB Encoders (we recommend the EG Starts kit based on price/quality)
- USB Hub (needed to connect the 4 USB encoders + keyboard + mouse)
- Custom 4 Player Control Panel (for a professional look at a decent price, we recommend the new 99 Lives Flat Control Panel)
- Double Sided Mounting Tape (to secure USB encoders to control panel)
- Phillips Head Screwdriver
- Power Drill
- MacroDroid (optional to change the default start app)
*Some of the links on this page are affiliate links. If you choose to purchase through those links you’ll be helping out this small time blogger in their quest to produce more rad content.
Step 1: Remove the Arcade1Up Control Panel
With the arcade machine OFF, remove the 4 top screws holding the control panel in place. Next, pull up on the control panel and detach the 2 cables connecting the control panel to the PCB.
Remove the black plastic base from the bottom of the control panel by unscrewing the 13 screws and put aside as we will later install it onto the custom control panel.
We will also remove 4 corner screws from each joystick so we can re-use them when installing the new joysticks in the next section.
Next unscrew the power switch, volume switch, and control panel encoder board as we’ll be re-using these components. Lastly, unplug all the joystick and button wires from the encoder board (except for the wires connecting the power and volume switch) and set aside for later.
Step 2: Attach New Joystick/Buttons to Custom Control Panel
Starting with the 1st joystick, insert the joystick into the 1st joystick slot and screw in with the 4 screws that were removed earlier from the old joystick.
IMPORTANT: Make sure the joystick cable slot is facing the left side as seen in the Finalized Wiring diagram below otherwise your joystick controls will be inverted.
Next, install the matching buttons and fasten with the included plastic nut.
Repeat for the additional joystick/buttons sets. We created the below Custom Control Panel Button Layout to help you with usb encoder mapping in the next section.
Custom Control Panel Button Layout
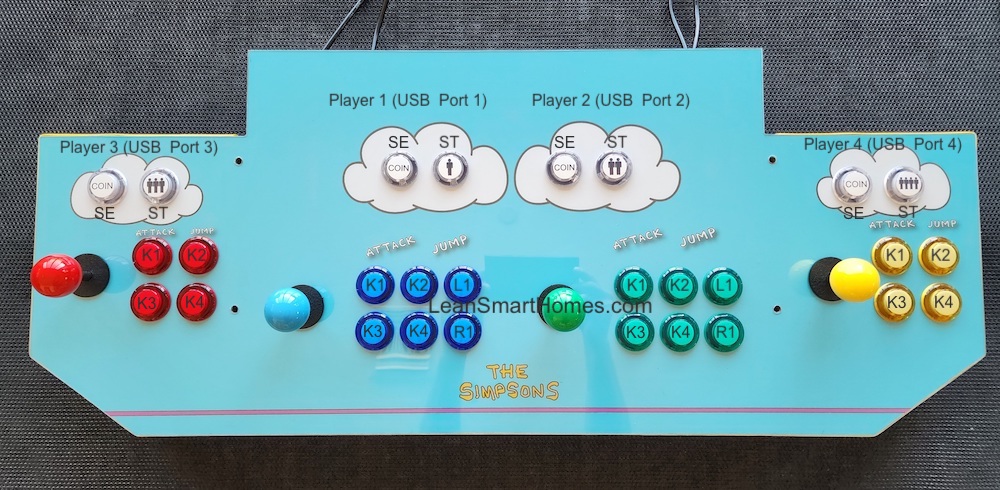
Note: It is not mandatory to follow this exact button layout and encoder mapping which has been provided for simplicity. What’s most important is consistency of the USB encoders being connected identically for each joystick set in order to make life easier when you later configure the joystick/button inputs in RetroArch).
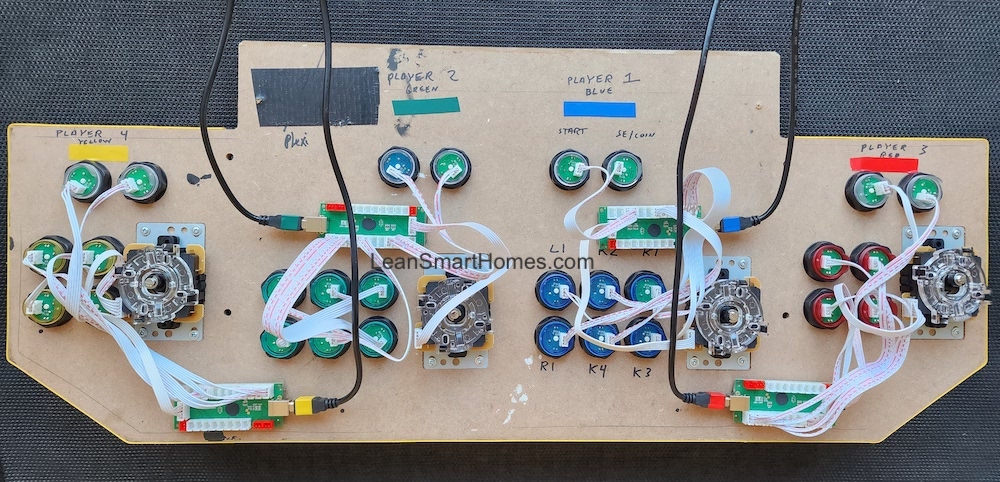
Step 3: Connect Joystick/Buttons to USB Encoders
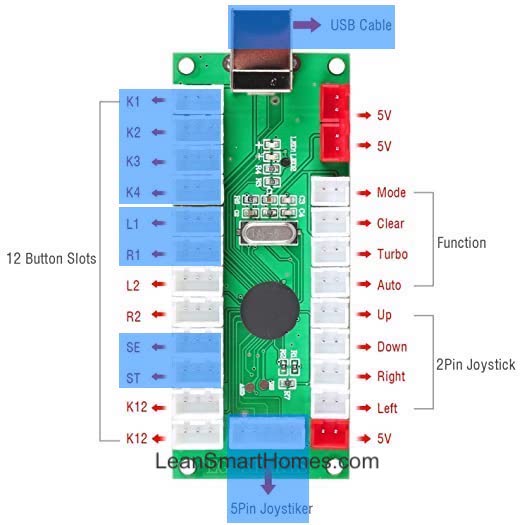
For simplicity, we’ll be using the wiring mapping in the below diagrams. Highlighted in blue are the connection points on the USB encoders that we’ll be connecting to.
Starting with the 1st USB encoder that we’ll connect 8 blue buttons to, attach the 5-pin ribbon from the joystick to the encoder. Next connect the ribbons for the 8 blue buttons (K1, K2, K3, K4, L1, R1, SE, ST) to the encoder.
Encoder Mapping – 8 Buttons
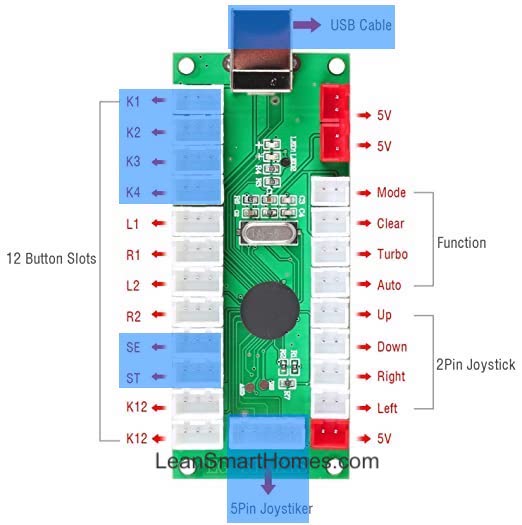
Encoder Mapping – 6 Buttons
Now finish connecting the additional USB encoders. To secure the USB encoders, we applied some double sided mounting tape and attached the encoders to the bottom of the control panel.
IMPORTANT: Ensure the black plastic cover seats properly on the custom control panel without snagging any wires. After much trial and error, we put together the Finalized Wiring diagram and Encoder Placement below that should help you.
Finalized Wiring Diagram and Encoder Placement
Step 4: Install Custom Control Panel
Drill 2 holes into the black plastic base as shown below for the 4 USB encoder wires. We used a 1/2″ drill bit but had to enlarge the hole further, therefore a bigger drill bit would be recommended.
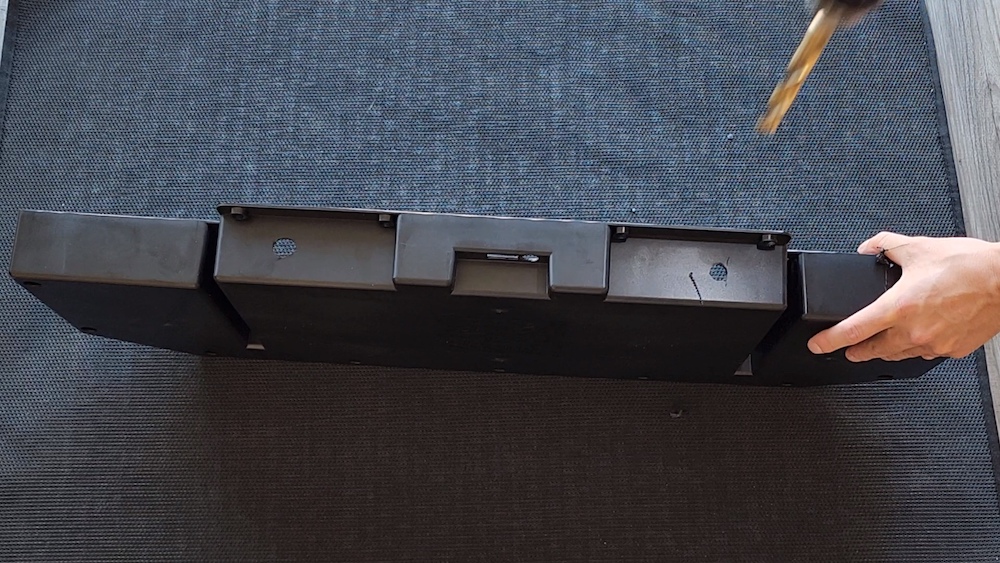
Pull the 4 USB encoder cables through the holes on each side of the black plastic base and plug in to the USB encoders. We labeled both ends of the cables with colored electrical tape to make them easier to identify later.
Attach the black plastic base to the bottom of the custom control panel and screw in the 13 screws.
IMPORTANT: Before screwing in all 13 screws, just screw in a couple to hold the black plastic base in place in case you need to troubleshoot the wiring and disassemble again.
Connect 1 USB encoder cable to the 1st port in the USB hub connected to the PCB then gently place the custom control panel onto the cabinet.
Lastly, re-connect the power switch and volume switch board to the PCB. Plug back in the arcade machine power cord and turn on the machine with the power switch.
Note: At the time of this writing we haven’t mounted the power and volume switches onto the control panel so it’s currently tucked away inside the cabinet. We later plan on drilling holes into the Control Panel and place them there just like the stock control panel.
Step 5: Configure Control Inputs in RetroArch
With the arcade powered on, ensure only 1 USB Encoder is plugged into the 1st port of your USB Hub for Player 1 (along with a keyboard and mouse) and navigate to RetroArch → Settings → Input → Port 1 Controls.
Select Set All Controls using the Player 1 Joystick and assign your buttons. You can ignore the bindings that you don’t have buttons for by letting the setup finish without pressing any keys.
After the setup is complete, click Save Controller Profile then select Reset to Default Controls.
Quit RetroArch then relaunch and confirm you can navigate around with the Player 1 Joystick in the RetroArch menus and that all buttons work as expected when playing a game. If all looks good, plug in the other 3 USB encoders and they should all work as expected.
Step 6: Change Default Start App (Optional)
At the time of this writing, the factory Arcade1Up games do not support 3rd party joysticks/buttons therefore we need a way always start RetroArch (or Dig) whenever you turn on the arcade machine instead of launching the factory Arcade1Up games. There is however a workaround we are investigating to make this backwards compatible.
For the MacroDroid tutorial, see:
Was this Setup Guide helpful to you? Have questions on configuration? Head over to our YouTube channel for answers or to discuss your recommendations and be sure to Subscribe to get alerted with the latest updates!
Be sure to check out the previous article on How to Hack Your Arcade1Up Machine to Add 1,000s of more Games!