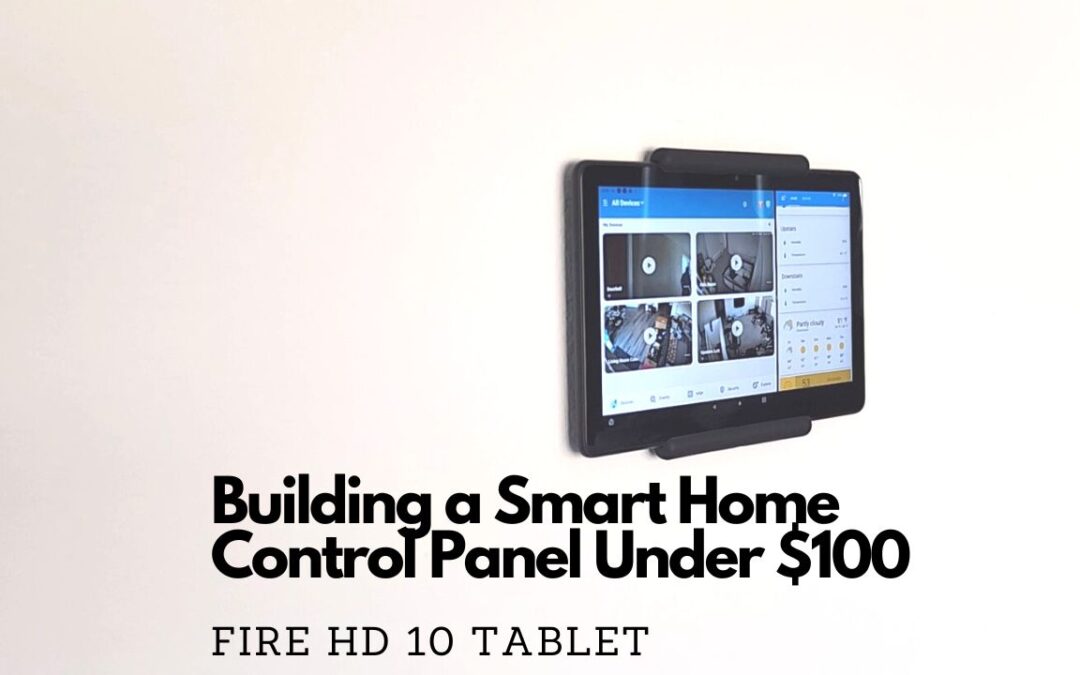
Building a Smart Home Control Panel using a Fire HD 10 Tablet
Are your Smart Homes projects really starting to come along but you feel like you are missing something? Want to be able to easily monitor and control all of your smart devices from just one centralized control panel?
In this guide we’ll walk you through building a Smart Home Control Panel for under $100 using the latest Fire HD 10 Tablet. We are also going to mount this tablet to the wall for a professional look just like you see in those multimillion-dollar houses on TV and in the movies for a fraction of the price.
Disclaimer and Warnings
This site is for educational purposes only. Proceed at your own risk. There’s a chance this approach will void your Fire HD 10 Tablet warranty and may prevent you from getting any future software updates. There is also the possibility you could brick your tablet if the original Android system files or settings are altered beyond repair. Future Fire HD 10 Tablet software updates could also lock down the system preventing your tablet or this method from working.
Current Limitations
This approach worked on the latest Fire HD 10 Tablet (2021 release, 32 GB edition) and should also work on older Fire tablets. We chose the Fire HD 10 Tablet because it’s currently the best deal for a tablet with a 10.1″ 1080p Full HD touch screen, 8-core processor, 3GB RAM, 32GB storage, and up 12 hours battery life. You could go with other manufactures, but you won’t find a better deal than this plus the tablet is warrantied and supported by Amazon.
Tools Needed
- Fire HD 10 Tablet (2021 release, 32GB edition regularly on sale under $100)
- Tablet Wall Mount (We went with a low cost, low profile mount in the link)
- Power Drill and Phillips-Head Screw Driver
- Extended USB C Cable Right Angle (Optional if you need an extended power cable with a clean right angle look)
- Anti-Glare/Anti-Fingerprint Screen Protector (Optional but tablets are notorious for glare and being fingerprint magnets)
*Some of the links on this page are affiliate links. If you choose to purchase through those links you’ll be helping out this small time blogger in their quest to produce more rad content.
Step 1: Download the Google Play Store APKs onto Fire HD 10 Tablet
The Fire HD 10 Tablet by Amazon runs on Fire OS, which is a forked version of Android OS with a custom home screen. From factory it does not come with the Google Play Store since Amazon includes their own Amazon AppStore. You’ll notice that the majority of your smart device apps cannot be found in the Amazon AppStore, therefore we are going to sideload the Google Play store onto your tablet and allow most Android apps to be installed.
First we’ll update the tablet by navigating to Settings > Device Options > System Updates > Check Now.
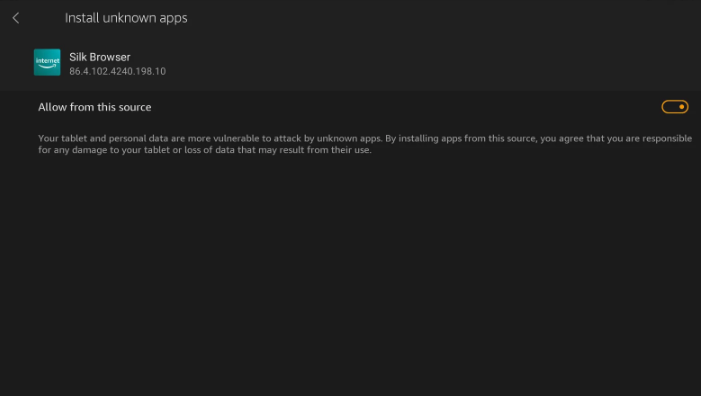
Next we’ll Enable Apps From Outside Sources. Navigate to Settings > Security & Privacy > Apps from Unknown Sources > toggle Silk browser to Allow from this source.
Using the Silk Brower on your Tablet, download the below 4 Google Play Store related apk files BUT DO NOT INSTALL YET.
- Google Account Manager 7.1.2
- Google Services Framework (v9-4832352)
- Google Play Services (64-bit ARM, nodpi, Android 9.0+)
- Google Play Store
IMPORTANT: This combination of files will only work for the Fire HD 10 Tablet. Newer files exist but these were tested as of 10/8/2022.
Step 2: Install the Google Play Store APKs
Next we install the apps. Open the Files app then navigate to Downloads.
IMPORTANT: The Apps MUST BE INSTALLED IN THE CORRECT ORDER. Also after your install each app, DO NOT PRESS OPEN on any of the installed apps. We need to reboot the tablet before accessing the Google Play Store.
Here’s the order in which we need to install the downloaded apps.
- com.google.gsf.login
- com.google.android.gsf
- com.google.android.gms
- com.android.vending
After installing all 4 apps, we now need to reboot the tablet. Hold down the power button and click Restart.
Once the tablet is rebooted, open the Google Play Store and sign in with your Google account.
Step 3: Install Smart Home Apps onto Fire HD 10 Tablet
Once logged into the Google Play Store, start downloading your smart device apps.
Some of our favorite smart home devices include:
And of course, no Smart Home Control Panel is complete without Home Assistant, the one app to rule them all. We walkthrough setting up Home Assistant in a follow up guide.
Another great app that we recommend is Fully Kiosk which allows you to lock a specified app or browser page on your tablet and keep the screen on without sleeping. There’s also another solution we use to keep the screen on using Split Screen and Home Assistant in the following sections.
Step 4: Mount Tablet Wall Mount
Now let’s mount our tablet to the wall using this low cost, low profile Tablet Wall Mount. Although the mount description doesn’t explicitly say this will fit a Fire HD 10 tablet, you can see in the video and photos that the mount securely holds our tablet in place as expected.
Start by measuring the dimensions of the tablet so you can mark the mounting locations on the wall with a pencil. After you get a general idea of where the tablet would be mounted, we’ll first secure the bottom mount with the 3 provided screws and hand tighten. If you are mounting to drywall, it’s recommended to also install the included drywall anchors.
Next insert the tablet in the bottom mount and while holding the top mount in place, mark that top mounting position on the wall.
Then drill in the top mount with the 3 provided screws and hand tightened.
Lastly, insert the Tablet to ensure a secure and snug fit.
You can optionally wire the power cord through the wall but may need need a longer cable like this Extended USB C Cable Right Angle that we used to give it a clean look.
IMPORTANT: Check with your local housing codes on the rules for wiring through walls.
Step 5: Setup App Split Screen (Optional)
Don’t have the Home Assistant app setup yet and want an easy way to simultaneously display 2 smart device apps on your screen? The Fire HD 10 tablet now natively supports the Split Screen feature.
To enable split screen, first open an app that you want to appear on the left side of the screen and tap the Task Switcher (square icon in bottom right) to see recently opened apps.
Next tap the app icon and select Split Screen from the menu. Select a second app to open in split screen view alongside the first.
In our case, we use Split Screen to display our interior Eufy Security Cameras alongside Home Assistant. Since we use one of our Eufy Security cameras as a baby monitor for our toddler’s room, the only way to stream a consistent video feed from the camera from our experience is by using the Eufy app directly.
Another trick we use to keep the screen on without sleeping is by going to Home Assistant > Settings > Companion App > enable Keep Screen On.
Step 6: Reduce or Remove Amazon Clutter and Ads (Optional)
There are a couple of tricks to help clean up the bloatware Amazon installed on the Home Screen.
Navigate to Settings > Apps & Notifications > Amazon App Settings > Home Screens. Uncheck Recommendations and Continue and Recommended Row.
On the Home Screen you can delete some of the apps by holding down the app and clicking Uninstall App. For the apps that Amazon does not allow you to delete, you can group them all together by holding down on the app and dragging it onto another app.
Lastly, the only legal way to remove ads on the lock screen is by logging into your Amazon account and paying a $15 fee. There’s ways to root the device and delete the ads, but future device security updates will force you to redo this procedure.
To make the ads a little less annoying you can navigate to Settings > Apps & Notifications > Amazon App Settings > Special Offers > enable Content Filtering.
Was this Setup Guide helpful to you? Have questions on configuration? Head over to our YouTube channel for answers or to discuss your recommendations and be sure to Subscribe to get alerted with the latest updates!
Interested in a simple ‘set it and forget it’ Smart Blind automation solution? Check out the next guide on installing our favorite budget friendly IKEA FYRTUR Smart Blinds.